FS25: Important Tips to Finalize your first mod

FS25: Important Tips to Finalize your first mod
Your mod is finished? Now, you can share your mod with the world and let other people enjoy using it when they play Farming Simulator 25.
In This Article, we will learn.
- Putting the finishing touches on your mod
- Preparing your mod for the in-game store
- Letting others play your mod
You may wonder how to get your mod on their computer. Chances are good that you’ve already installed and played your fair share of other peoples’ mods. You at least know how those mods got into your game. You can work backward to sort out some of the details with just a few finishing touches and polishes that may be somewhat less obvious. This tutorial aims to help fill in those blanks.
How to Finalize Your Mod
When you first started making your mod, you created a modDesc.xml file. More than likely, you only filled in the tags that were really necessary to get your mod working in-game. Perhaps you copied the modDesc.xml from the sample mod that comes with Farming Simulator 25 and only made a few minor changes. Now, you need to revisit your modDesc.xml and make it final.
Here are some important tips to help you finalize your mod. Tutorial for a complete lowdown on setting up your modDesc.xml file.
- Author and version: You want people to know who made this mod, right? Make sure your name is in the author tag. And if you’re releasing your mod for the first time and you consider it complete, set the version number to 1.0. Players don’t care how many internal versions and revisions you make before release.
- Descriptions: You can describe your mod in two different places within the modDesc.xml: at the beginning for the overall mod and within the storeItems tag for each item in your mod that appears in the in-game store. Make sure these descriptions are up-to-date and accurate.
- Price and upkeep: Make sure these values are set to realistic numbers before you release.
- Localization: Because Farming Simulator 25 is a game with an international audience and is played in 12 different languages, you may want to translate the descriptions in your mod to the big three (English, German, French). You can use an online translator to help, but I suggest you find a friend or perhaps someone else in the modding community to help you with any languages you’re not familiar with.
- Icons: The next section of this article covers icons in more detail. Just make sure your modDesc.xml points to the right files for now.
- Paths to scripts and other assets: If your mod uses any custom Lua scripts or a customized vehicle XML file, double-check the paths to those files and make sure everything is where it’s supposed to be and named appropriately.
I suggest that you also go through the assets in your mod and freshen your naming. Make sure files have names that make sense (for example, heavyTractor.i3d instead of myTest14.i3d). Check the naming within each file, too. Parts of your mod should be named after what they are or what they do. With releasing a mod comes the implied obligation of maintaining it and fixing any bugs that players discover. Opening an old file of yours to fix a bug and finding the Scenegraph littered with objects that are all named transform and Cube is a very unpleasant experience. What could have been a 5-minute fix can end up taking much longer because you have to spend time to find that one object on a map, and it has the same generic name as 30 other objects all over the scene.
How to Create Store and Brand Icons
How a mod appears in the in-game store can really add to the feeling of completeness. You spent all of this time sweating over every minor detail in creating the 3D assets and scripts for your mod. Don’t cheapen it by slapping on a store icon cobbled together in a few minutes in MS Paint.
Furthermore, quite a few mod-hosting sites use the in-game icon as the link to see your mod, so you want to make a good first impression with players who may use your mod. These sections explain how you can wow players with the right store and brand icons.
How to edit a Store Icon
Requirements for the store icon are pretty straightforward — a PNG (or DDS) image that’s 256×256 pixels in dimension. In fact, included in Farming Simulator’s sdk folder (typically C:/Program Files/Farming Simulator 2025/sdk on a Windows computer) is an image named store_template.png. If you open that file in Photoshop, you can use it as a background for a nice image of your mod.
I like to render a relatively high-resolution image of the model from my 3D software. However, some people prefer a more in-game look. For that, you can take a screenshot of your mod from within GIANTS Editor. In either case, you can clean and scale that image in Photoshop so it fits in the available space of store_template.png.
If you’re rendering from a 3D program like Blender, Maya, or 3DS Max, try to render a PNG with an alpha channel for transparency. Doing so can make it easier to overlay the background of store_template.png.
If you’re taking a screenshot from within GIANTS Editor, you probably added at least one light so your mod could be seen well. Toggling View > Show > Lights to off in the menu hides the lines of that light for a cleaner screenshot.
After you get your store icon image arranged the way you want, save it as a PNG (or better, a DDS) in your mod’s folder. Make sure you use a name that makes sense and double-check that your modDesc.xml correctly points to that image.
How to add a brand icon
Whether your mod is a piece of equipment with a known brand or something that you’ve made on your own, you may want to include an icon for the store that indicates the brand. Brand icons follow the same basic rules as store icons for your mod, but with only a couple of minor differences. Brand icons are PNG or DDS images and have dimensions of 256×128 pixels.
How to Submit and Share Mods
When you’re ready to package and share your mod with the world, these sections can get you up to speed.
Exporting and packaging your mod
When packaging your mod, do a final export from GIANTS Editor into a new folder somewhere else on your hard drive. Doing so can ensure that all of the files required for your mod are in the same place. Doing so is also a quick way to clear out any unnecessary files that may have crept their way into your mod folder. For example, some programs like to leave what I call file litter, which is usually a backup of your previously saved version of that file. Blender does this with its .blend1 files, and some text editor programs leave .bak files that serve the same purpose. Exporting leaves those files behind because a player won’t need them to run your mod in the game.
To export your mod with all of its necessary files, open it in GIANTS Editor and then take the following steps:
- Choose File > Export All with Files.
- In the file browser dialog, navigate to the place on your hard drive where you want to export. I like to choose the desktop because it’s easy to remember and easy to clean up when I’m done.
- Make a new folder for your mod and its files. Depending on your OS, there should be a button in the file browser dialog for making new folders. You also can create a new folder using the right-click menu in the file area.
- Type a name for your I3D file. Using the same name you’ve been using for it is okay.
- Repeat the first four steps for each I3D file in your mod.
- After you finish exporting, you may want to double-check your newly exported mod to make sure everything is properly in order and nothing was lost in the process.
If something is missing, simply copy it over from the original mod folder. For example, scripts may load files that are in none of the I3D files. So be sure to copy any Lua or XML files that you need.
With your mod neatly exported to a fresh new folder, you can package it for sharing with the wider world.
Follow these steps to get your files in a Zip archive in Windows:
- From Windows Explorer, go to your export folder and select all files.
- Right-click and choose Send to > Compressed (zipped) folder. Depending on the size of your mod, you may have to wait a few seconds after this step while your computer packs all of your files into the Zip. When it’s done, you should see a new file sharing the same name as your folder. The only difference is that its icon has a zipper on it. That’s your Zip file.
- Rename your Zip file to something you like, or you can choose to keep the name as-is and just press Enter on your keyboard.
Distributing and maintaining your mod
Dozens of sites on the Internet exist with the exclusive purpose of hosting mods for Farming Simulator 25. Each one has its own mechanism for uploading and approving mods. We invite you to upload mods to our website with the upload form here.
The following is a short list of what you need:
- Don’t forget to test your mod with TestRunner before uploading.
- Your mod is packed in a zip file: See the previous section about packaging your mod. You have the option here to use the modDesc.xml in your Zip file to fill in your mod’s metadata or the information about your mod, such as the name, author, and description. Keep this checkbox enabled, and many of the other fields on this page should automatically populate.
- Localized title and description: If you chose to load metadata from your modDesc.xml, these fields should already be filled in. Otherwise, you can fill them out manually.
- Categories: Categories aren’t part of the modDesc.xml, so you need to make some decisions here. You can add your mod into up to three different categories. Make sure the categories you choose are appropriate in order to help people find your mod.
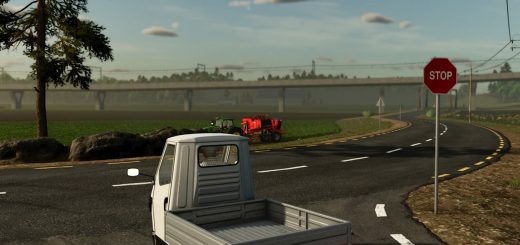
- Screenshot: This is typically an image of your mod taken from within Farming Simulator 25. The preferred size for this image is 560×350 pixels.
- Make sure all of the fields are properly filled in, and you’re good to go.
- Submit your mod for certification by clicking the Submit button and waiting for it to be approved.
The approval process may take a day or two.
You’ve created a mod, and you’re releasing it to the world. This mod is your responsibility. Players expect that if they run into a problem with your mod or if they have a question about it, you can fix the problem or try to answer the question. Most sites hosting mods allow you to upload updates and fixes to your mod. Take advantage of this feature. Doing so makes you a positive contributor to the Farming Simulator community and the modding community in general. Maintain your first mod well, and you’ll have a group of players eager to try out your next one when it’s ready.
Author: farmingsimulator25mods.com