GIANTS Studio Modding Tool for FS25


GIANTS Studio Modding Tool for FS25
Another essential application in the Farming Simulator modding environment is the GIANTS Studio. It is an integrated development environment (IDE) made specifically to assist with programming mods for the Farming Simulator. An IDE is an application that provides additional resources to programmers for software development. The GIANTS Studio consists of a script editor and many debugging tools, which we will cover in this tutorial.
Technical Requirements
You will need to download the GIANTS Studio and, optionally, additional software for this tutorial. As such, you will need an Internet connection and web browser available to you. The minimum requirements for the GIANTS Studio and other applications are as follows:
- Farming Simulator 25
- Windows 10 64-bit
- Intel Core i5-3330 or AMD FX-8320 or better
- Nvidia Geforce GTX 660, AMD Radeon R7 265 graphics card or better (min. 2 GB VRAM, DX11/DX12 support)
- 8 GB RAM
- 35 GB free hard drive space
- Sound card
Installing the GIANTS Studio
For example, when installing the GIANTS Editor, you will need to navigate to the Downloads section of the GDN. You should have a GDN account at this point but do remember you will need one before you can download any software available from the GDN. When you have navigated to the Downloads page, install the GIANTS Studio available for your platform (it should again be at the top of the list).
Once the executable has been downloaded, run it and proceed through the steps listed in the setup wizard. When the setup tasks have been completed, launch the GIANTS Studio application, and you should be greeted by the same welcome menu as the GIANTS Editor. The next section will teach you how to navigate the GIANTS Studio.
Application Menus
In this section, we will explore the various application menus in the GIANTS Studio and discuss which options you should know about as a beginning mod creator.
The File Menu
The contents of the File menu of the GIANTS Studio are almost the same as that of the GIANTS Editor. However, there are two new options: New Project and Open Project. The New Project option will prompt you to create a new mod project. Your new project will be saved as a .gsp file, and you will be prompted to configure certain project settings. We will walk you through this process in the “Debugging Scripts” section of this tutorial. The Open Project option will simply open one of your .gsp files, allowing you to pick up from where you left off.
In the next section, we will look at the Edit menu.
The Edit Menu
The Edit menu provides several new functionalities, the first being the Find tool. While there are many options you can use with this tool, the most commonly used are the standard Find action (Ctrl+F), Find in
files (Ctrl+Shift+F), and Go to Line (Ctrl+G) tools. The Find action is straightforward and simply looks for strings in the current script that match your input. Find in files searches all the current scripts within your project for strings that match your input; the results will be returned to you in the Find Results tab. Finally, Go to Line will bring up a new modal window with a box that asks for you to input a line number. Once inputted, your line selection will move to the specified number, and the box will close.
The Replace action will bring up a menu in the IDE in the same window as the Find tool and will prompt you to provide two strings. The first string is what you want to find in your script, while the second is what you want that string to be replaced by. This feature can be applied to more than one script at a time, but make sure you know what you are replacing to avoid creating new bugs.
In this menu are also some quick actions for commenting or uncommenting your Lua code. You can comment or uncomment highlighted code by pressing Ctrl+K or Ctrl+Shift+K, respectively.
In the next section, we will look at the options in the View menu.
The View Menu
The View menu contains a list of the menus within the GIANTS Studio. By selecting an option from this menu, it will display the associated tab. Let us now look at each of these menus and what information they show.
The Globals and Locals tabs will show you the names and values of globally and locally defined variables in your script. These are valuable because, when combined with other tools, you can see if a variable is taking on the value you expect it to at different points in your program’s execution.
The Watch tab will allow you to specify variables you want to keep track of. These variables will be tracked even as your program switches between scopes, giving it a different use case than the Globals or Locals tabs.
The Script Console functions much like the Console menu of the GIANTS Editor, allowing you to write and execute Lua code. The main difference is that the Script Console of the GIANTS Studio only executes code when in a debugging session and directs output toward the Output menu, which is covered later in this section.
The Callstack tab allows you to see what series of calls have been made at a point in your program. For example, if you halt execution while in a function that was called by another function, then the call to both functions would be visible in the call stack. This is particularly useful in tracing the source of an error for more complex programs.
To actually halt the execution of your program, you will need to use Breakpoints. The Breakpoints tab will allow you to see and manage the breakpoints in your program. We will discuss this menu and the concept of breakpoints more in the “Using Breakpoints” section of this tutorial.
Through the Memory and Allocations tabs, you can see how much memory is being used by each part of your program. If you encounter a memory leak, that is, a fault in your program that causes computer memory to be used but never freed up, this tool can be used to fix that problem.
The Output tab is where the output from the Farming Simulator, your mod files, and Script Console executions are directed.
The Error List tab will show you the current syntax errors in your program. If there is an error in your code at runtime, this will be shown via the Output tab.
When using the Find in Files tool discussed in the “The Edit Menu” section, results will be directed to the Find Results tab.
Like in the GIANTS Editor, the GIANTS Studio has a Toolbar containing buttons for quickly doing actions. You can again customize which sets of actions are visible via the Toolbars option.
The Navigate Forward and Navigate Backward options will move your cursor to places it has been previously within a script or across files you have opened in the script editor portion of the IDE. Note that the key bindings associated with the action are Alt+Left and Alt+Right, respectively.
Lastly, Reset Window Layout will reset the layout of all windows and menus in the GIANTS Studio to their default positions.
The following section will explore the contents of the Debug menu.
The Debug Menu
The Debug menu contains a list of actions for using various tools offered by the GIANTS Studio. You will learn how to use all of these actions in the “Creating and Debugging Scripts” section of this tutorial. For now, we will continue to the next section and discuss the Window menu.
The Window Menu
The Window menu in the Studio contains only three options: Reopen Tab, Close Tab, and Close All Tabs. The Reopen Tab option will reopen the most recently closed editing tab. The Close Tab button will only close the tab you are currently focused on, while Close All Tabs will close all editing tabs you have opened.
We will now look at the options in the Help menu.
The Help Menu
The Help menu of the IDE is identical to that of the editor. You can see the overview of these options in the “The Help Menu” section, “Getting Started with the GIANTS Editor.”
Now that we have covered all of the application menus of the GIANTS Studio, we will look at other windows and elements you should familiarize yourself with.
New Project
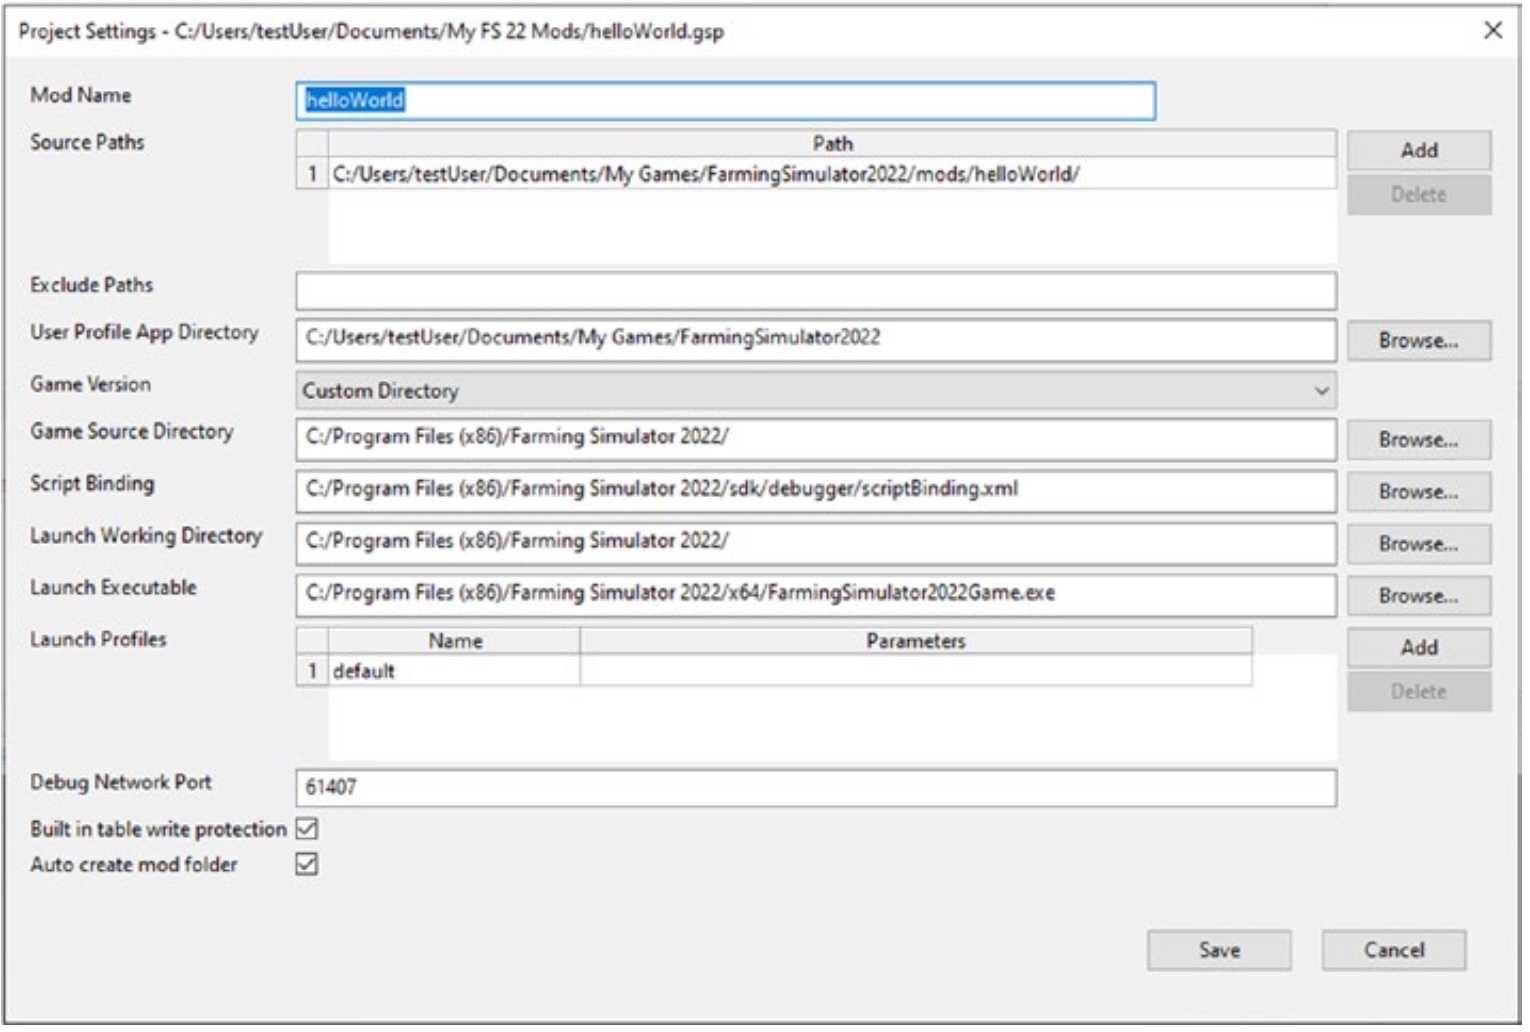
Before you create any script files, we will create a new mod project. To do this, we will navigate to the File menu and select the New Project option. After choosing a name for your project, a menu like that below is displayed. If Farming Simulator 22 is installed on your computer, the GIANTS Studio will take care of setting the correct paths. Make sure that the option “Auto-create mod folder” is activated.
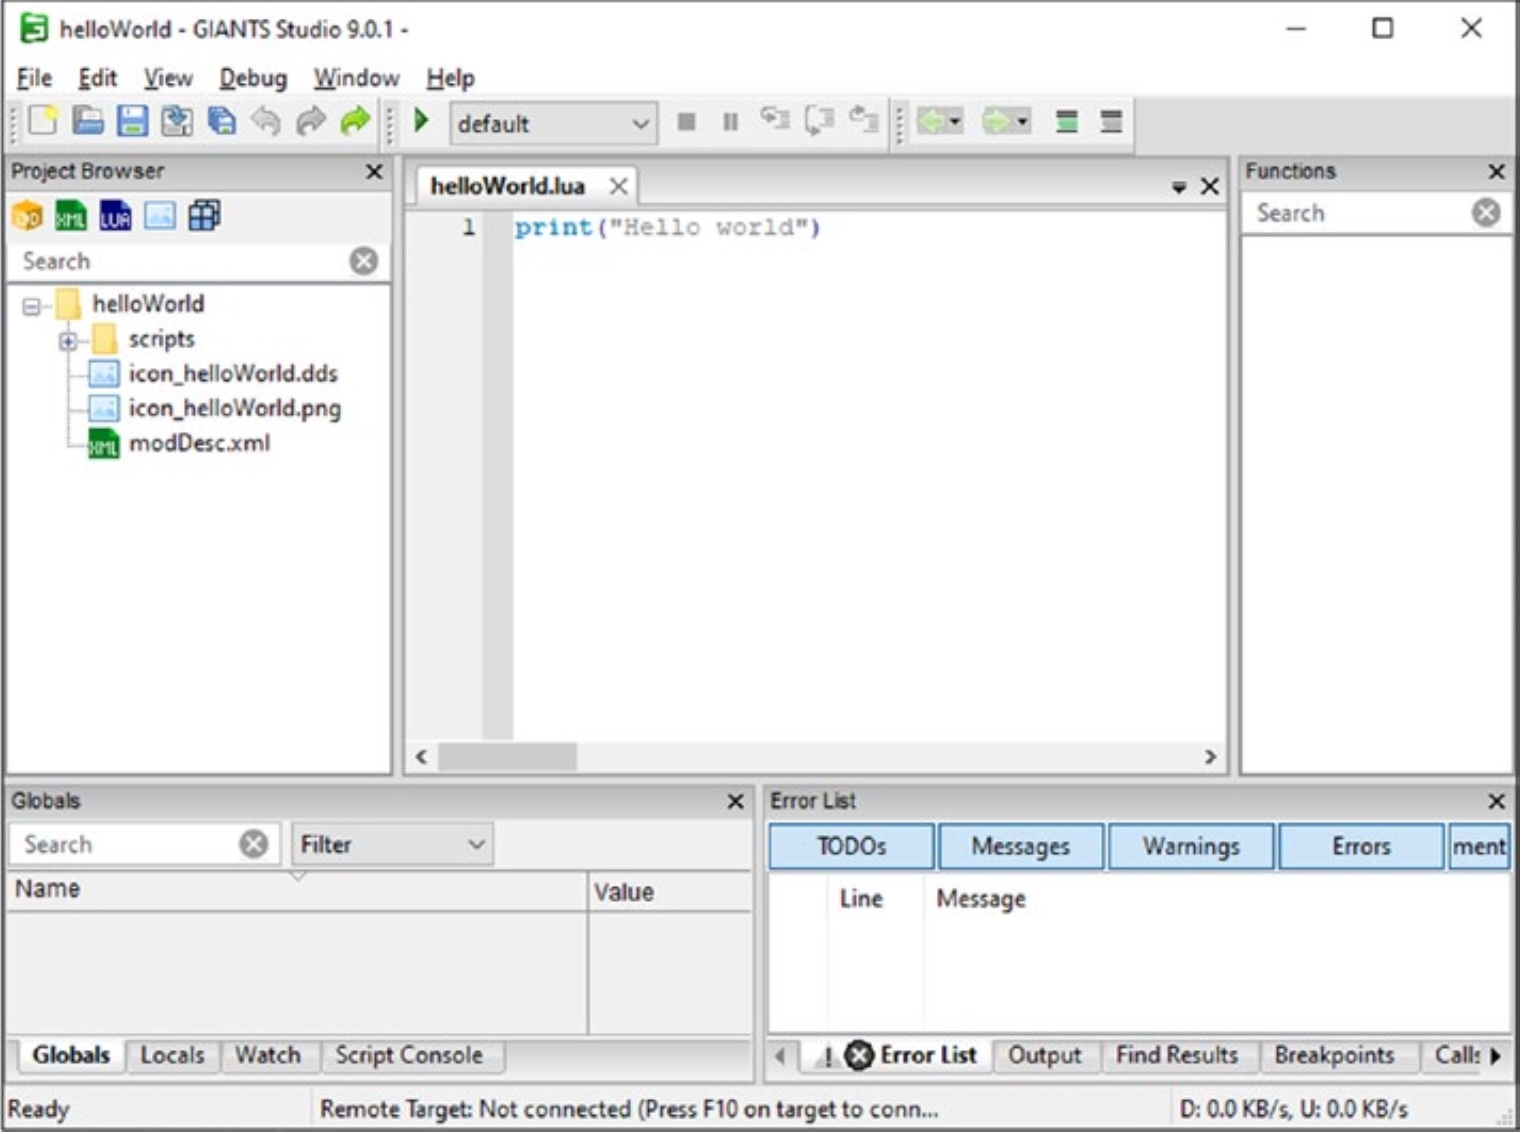
Once you’ve created your project, the Project Browser on the left side of the application should already display a sample mod layout:
The helloWorld.lua file is already opened in the main script editor window. But first, we should also have a look at the modDesc.xml file, which is the entry point of each mod.
To do so, double-click the modDesc.xml file, and it will open it in the main script editor window of the IDE. You should see the following code in the modDesc.xml:
<modDesc descVersion=”72″>
<Author>GIANTS Software</author>
<version>1.0.0.0</version>
<multiplayer supported=”true” />
<title>
<en>Sample Mod – Hello World</en></title>
<description>
<en>A sample mod</en>
</description>
<iconFilename>icon_helloWorld.png</iconFilename>
<extraSourceFiles>
<sourceFile filename=”scripts/helloWorld.lua”/>
</extraSourceFiles>
</modDesc>
Let us break down what each part of the .xml tells the game about your mod and why they are needed. In the first line, we specify the XML declaration, which describes some information about the .xml file. It is read by XML editors to get more information about the .xml format. This is not relevant to the functionality of your mod but is needed for .xml files. Next, we have the descVersion field which specifies the minimum feature set of the game needed to run the mod. The descVersion field should always be set to the current available game patch version; that value can be found in the newest ModHub Guidelines.
The next field is the author section, which records who the mod author is, which is you! It’s important to include this field so that you are credited for your mod when it is published to the ModHub. The version field defines the current version of the mod; this is required so that you can specify different versions when you update the mod and publish it again to the ModHub. The multiplayer supported field specifies whether your mod supports multiplayer gameplay. If enabled, the mod will be selectable when creating a multiplayer game and hidden otherwise.
Next, we specify the title of your mod using the title field. The text in this field will be used when your mod is displayed in the mod menu, and you support multiple languages by wrapping the text with the locale. In the preceding example, we say this is English with an <en></en>.
Similarly, the description field will be used to display a description of your mod under the title in the mod menu and can also be localized with different wrappers. You can also define an icon for when your mod is displayed by defining the iconFilename field. The field should contain the path to the image file relative to the mod folder.
Lastly, we specify what scripts should be loaded by using the extraSourceFiles field. Here, you should list each .lua file in a sourceFile wrapper, setting the file name to the path of your script relative to the mod folder. As you can see, we want to include a script called helloWorld. lua. Studio already created this file during the setup process of the sample mod.
In the next tutorial, we will learn how to set up a sample mod.
Starting the Game
GIANT Studio successfully set up a sample mod for us. Before proceeding, let’s first test whether the mod successfully loads in the game.
To launch the game, navigate to the Toolbar and click the Start button, indicated by the icon in the image below. Alternatively, you can use the Start without Debugging option from the Debug application menu for a faster startup time. Farming Simulator should launch automatically and present you with the main menu. If you launched the game without debugging, you must press F10 to connect the GIANTS Studio to the game; you should see the IDE connected in the Output tab.
Once on the game’s main menu, go to Options > Display Settings and select the Windowed Mode. When you debug your program in the next section, the application will halt processes, preventing you from switching applications if the application is in fullscreen mode. Next, return to the main menu and select Career, pick an empty save slot, and then select any difficulty and any map. Once you have selected a map, click Continue, and you can select the mod(s) you would like to run in your game, as seen in the image below. If this menu does not appear, make sure you have placed your Mod Directory folder in the correct location under
the mods folder of the Farming Simulator game directory. Additionally, you can look in the log.txt file or Output tab and check if your mod is listed in an Available mod: (Hash: a random md5 hash) (Version: 1.0.0.0) myMod format.
With your mod selected, click Start. Any output from your program should be directed to the Output window. We haven’t changed anything about the helloWorld.lua yet, you should find a single line, “Hello world,” in the Output window.
Author: Giants Software